HOW TO FREE UP SPACE ON YOUR ANDROID PHONE

It seems no matter how much storage you have in-built into your device you never quite have enough. If you’re anything like me, you are constantly trying out new apps and downloading movies to watch on the train, which doesn’t come without challenges.

SPACE ON YOUR ANDROID PHONE

There are however a few tricks you can employ to try to manage your space effectively.

  1. Employ the cloud
    There are a number of solutions out there that will allow you to save some of your photos / videos on a remote storage service. Some of the better ones include Dropbox, Google Drive and Box. All of these solutions offer a small amount of storage for free, so you can give them a try before buying one of their premium packages with more storage for a fee. Personally I use Dropbox which allows me to sync multiple devices across different platforms, providing a seamless experience when transitioning between my iPad, Samsung A9 Tab, Laptop and HTC Desire 816.
  2. Spring clean your device storage
    Download and install storage truth, a tiny app that will give you some insight into where your space is currently being used. You can then use a program like SD Maid and ES File Manager to trawl you device looking for uninstalled app data.
  3. Move your apps to your SD Card (Android 5.0 and lower)
    If you are using Android KitKat or earlier as your operating system, good news, you can actually move some of your larger applications to your SD card. To do this, go to your settings > storage > apps > move to SD card. If you want to continue using this method, you’ll either need to stop your device from upgrading to Lollipop, or root your device. You can also read BlueStacks offline installer
  4. Clear you app cache
    Your app’s storage requirement doesn’t just come from the system files required to run the app, it also includes some commonly used settings and historical data, especially with messaging apps, this can be as large if not larger than the system files. To clear this information out, you need to go to settings > apps > all then go into each app (largest first) and clear out the cached data stored. Keep in mind that all you login settings and historical media will be removed from the app, this may however still be stored in your gallery if setup that way.
  5. Uninstall unused apps
    About once a month I do a spring clean of my apps installed on my device, my general rule is that if I haven’t used the app in the last month, it’s not worth having, these can always be recovered by reinstall from playstore in your “MyApps” section, including your paid apps. To uninstall, go to settings > storage > apps then select the app you want to uninstall, then click uninstall.

Crime City Cheats for Facebook (FB)

You want to add WAVs and collection items on your Crime City profile? You came to the right place. I am gonna show you how you can get your own WAVs and collections with some simple crime city cheats.

crime city

Things you need to do the cheat with Crime City, Facebook.

  1. A web browser (Chrome, Firefox or any browser)
  2. Java Runtime Environment or JRE
  3. Charles Web Debugging Proxy (if you have 64 bit operating system make sure to download 64bit JRE and 64bit Charles)
  4. And your time.

If you use firefox with charles to do the cheat, make sure to install firefox extension of charles. Other else, it won’t work. If you use Chrome, by default Charles will work with Chrome.

Steps to be followed to make WAVs and Items;

  1. Install JRE on your system.
  2. Install “Charles Proxy”
  3. If you use firefox to do the cheat or play crime city then install charles proxy extension on your firefox. Chrome or other browsers should work fine without any extensions.
  4. (Optional Step) Open Charles proxy and open the game. You will see lots of requests are recording. To narrow those down go to charles preferences and make the following changes;Go to Settings >> Recording Settings >> Include Change Protocol to HTTP Change host to >> fb.crimecitygame.com Leave all other fields blank and click on ok.
  5. When charles is running try opening the game. You will see at right hand side only crime city’s requests are being recorded. Right click on the recorded session and enable breakpoints from there at first.
  6. The trick is very simple. You need to spend very few energy to make WAVs and Items. Since Canal Street consumes the lowest energy, you can create your WAVs and Items from there. Go to canal street and start doing some jobs.
  7. After executing each requests, response tab will pop up. From response tab go to AMF >> Return Value. Scroll down a bit, you will see 2 options which are; area_loot_id and collection_item_id. All you need to do is to change their values to what you want. If you see they have values as “null” don’t change those, your WAVs and Items won’t be added.

HOW TO GET FREE AMAZON PRIME MEMBERSHIP FOR 1 YEAR

Hi Friends We Are Back Again With Amazing Trick To Get 1 Year Amazon Prime Membership For Free Lot Of You All Enjoying Amazon Great Festival Sale Lot Of Deals Is Giving Amazon Under 499 So In Under 499rs We Want To Pay A Delivery Charge Of 40rs Per Product Its A  Bad Thing For All People For Amazon Prime Members Only Free Delivery And Free One Day Delivery Worth 100rs So lets Start ….

amazon prime

What Is Amazon Prime

      FREE DELIVERY

As a Prime member, get unlimited FREE One-Day and Two-Day Delivery on eligible items from India’s largest online store, to over a hundred cities. Prime items that are not eligible for free One-Day or Two-Day Delivery to your location, will always qualify for free Standard Delivery with no minimum purchase value

     Grab The Best Deals First

30-minute early access to top Lightning Deals

You can now be among the first to decide what’s hot and what’s not. As a Prime member, you get early access to top Lightning Deals every day, 30 minutes before other customers.  Choose the Prime Early Access filter when you search deals, and be the first to view the best deals every day

MUST READ – Paytm Bug – Rs 10 Paytm Cash In All Old Accounts + Proof

Steps To Follow to Get 1-Yr Amazon Prime Membership

  • First Of All Visit Here And Copy Any “VISA” Card Number CLICK HERE
  • And Sign In (Or) Sign Up With Your Amazon Account
  • And Give Fake Address And CheckOut
  • In Payment  Option Click “Debit Card” Option
  • Fill That Details That We Got in first Step Give Random “Name & Exp Date And CVV “
  • And Complete You Checkout
  • That’s All Instantly Your Account Turns Into Amazon Prime Account ..

NOTE WE ARE NOT RESPONSIBLE FOR ANY PROBLEM  OF YOUR ACCOUNT THIS IS FOR EDUCATIONAL PURPOSE ONLY….

PROOF

FINAL WORDS

So Friends This Is Our Article About To Get One year Amazon Prime Account For Free .Many Of You Looted A Lot 50rs Amazon Vouchers From DesiDime  So Use This Trick And Get Free Delivery  And Enjoy Great Offers from Amazon Share This post Thanks for visiting techtricksboy.wordpress.com

How to Fix Dpc Watchdog Violation Error In Windows

Most of the people in the entire worldwide region adopt in the utilization of advanced platform technology. Mainly, the windows platform is helpful for all desktop users with wide array of features and services. Those individual who are using windows platform like windows 8, 8.1 and 10 features incredible and easy way to access and finish the task without trouble. However, sometimes issues will occur for various reasons as manual settings change or some others malware actions. The above mentioned windows platform users experienced or not can know DPC watchdog violation issue. The DPC watchdog violation error is one among common issue in the windows platform. If you are in struggle and searching for the right solution to fix can follow above mentioned methods. Before, you have to know reason for the cause of such errors in the windows platform. Mainly, the DPC watchdog violation issue appears for certain reasons such as old SSD driver version, incompatibility of hardware issue, corrupted system file or unsupported SSD firmware. If you upgrade system into windows 10 and then some of the issues will appears as blue screen and saying error message.

Fix Dpc Watchdog Violation Error In Windows

Reasons for the cause of DPC watchdog violation error:-

If you, the individual utilize SSD on your desktop, you have to make sure first thing as current firmware SSD version and ensure it up to date. In addition, remove whether your system have incompatible hardware errors, eliminate any of the hardware from your desktop that you consider they are errors, specifically new hardware you recently plugged into the computer. If you are looking for the right way to remove the issues display in the computer as DPC watchdog violation can take a look on the exact solutions.

  • Outdated computer drivers: How long that you maintain your system with the outdated drivers, which cause pc affect by DPC watchdog violation issue on windows 8 or windows 10 desktop. Have you experienced in attempting update installed there? Initially, the desktops are regular use that watchdog issues are potential affected by outdated drivers. Check out the desktop drivers first and take a glance while it is important to update entire drivers one by one.
  • Incompatible and old SSD windows 8 or windows 10 operating system: Have you currently used old SSD or currently added new SSD on desktop and then you upgraded the desktop operating system? Nowadays, some of the old SSD which specifically designed and made with old firmware and not compatible for windows 8 OS and can get DPC watchdog violation issues. There’s no matter while you utilized old or newly purchased SSD just check out whether it changed or need to upgrade.
  • Harmful computer software’s: Such kinds of computer software’s, which harmful or incompatible can cause DPC watchdog violation issue as bluescreen display. Whatever you installed new apps can create stressful problems in the desktop. Some of the apps like VMware workstation 8 set improperly or installed, it is possible for negative impact on the windows platform. So, they will eventually leads to create DPC watchdog violation issues. So, you have to check out once while you installed such computer apps.
  • Others: Really, there are other ways can get people desktop display blue screen by watchdog violation issues like incorrectly windows upgrading from 8 or 10 OS. You have to make it better by finding as per the computer situations. These are the possible reasons for the essential cause of deadly DPC watchdog violation issue. If any of these reasons possible in your desktop don’t want to worry just continue reading to know how to fix the issue with available methods. Already, many people experienced in issues and simply cleared by the below mentioned methods.

Different methods to solve DPC Watchdog Violation error in windows:-

Everyone knows, most of the people engaged in the windows platform while compared to other platform users. The windows platform easier and understandable one to access nevertheless there are much possibility for cause of error. Here, you can get ready to know the simple steps to solve blue screen error in your windows system as 8 or 10 operating system.

  • Turn off fast startup: Sometimes, this method give the chance to solve the DPC watchdog violation issue and here the effective instructions.
  • The first thing, you have to access control panel. Ensure, that control panel view as large icon now select power options.
  • You have doubt what power buttons act and enter change settings that currently unavailable.
  • Now, uncheck fast startup turn on.
  • Method 2 Ensure corrupted hard drive: You can also try this method while you get blue screen issue in your desktop. You have to follow the steps carefully to clear the issue with the help of simple method.
  • First, you have to open command prompt in your system as administrator.
  • And then, you have to write CHKDSK C: /F /R and click enter.
  • You have to type Y and click enter button.
  • Now, you can restart computer to clear the error.
  • Method 3 Safe mode: This method is almost gives success while you trying to solve DPC watchdog violation error in windows platform. You have to follow upcoming steps.
  • You have to start system in safe mode.
  • So, you have to turn on pc now.
  • Now click power button to switch on pc.
  • And then, you have to continuously press F8.
  • Now, the screen will display as black with certain options.
  • Choose safe mode and enter.
  • Now, your pc will open in safe mode option.
  • You have to remove all the external drivers while you connect as well as network drivers.
  • You can go PC properties and device manager.
  • After you uninstall all these devices install again and get the latest drivers as complete update.
  • Now, you can restart the pc.
  • Fix system files: You have to scan and fix all the system files and it sometimes greatly works to solve DPC watchdog violation. Follow the tips carefully.
  • Disconnect all the network and internet connection.
  • Turn off the anti-virus software real time protection that you installed on desktop like internet security, antivirus and other third party application, etc.
  • Open a command prompt in an administrator mode.
  • Enter SFC / SCANNOW and click enter button.
  • You have to wait for awhile until the process complete.
  • Now, you can restart pc.

Many of the windows 8, 8.1 and 10 versions easily fix the DPC watchdog violation issue.

Also ReadHow To Fix Dns Probe Finished No Internet Error

  • Method 5 Restore entire system: This is simple and easy method to solve the problem. There’s no trouble in accessing this method.
  • Switch on desktop in safe mode.
  • Restore desktop in previous restore option.
  • Restart the computer and see whether the issue continues or removed successfully.
  • Reset OS or re-install windows: This is the good method and fine working on all windows version. If your desktop running good, but suddenly facing some issue like DPC watchdog violation, this is helpful and right method to solve the issue. Many of the windows 10 users facing this common issue as well as utilize this method without a doubt.
  • Turn on desktop in safe mode.
  • Enter into PC settings, update and recovery and click recovery option.
  • You can also select apt option and reset the system.
  • You may need windows pendrive or bootable disk.

You can easily repair desktop after you get DPC watchdog violation issue use pendrive or bootable DVD in another way. You have to restart desktop and repair system from windows setup menu option.

Follow these steps whether all other methods failed to remove error display of blue screen.

  • You have to understand which driver or software occur the error into your system.
  • Remove immediately driver or software nevertheless before accessing driver or software update to remove error.
  • Check out the antivirus in your system like AVG liable for error. Just uninstall the antivirus as well as re-install windows immediately.

Effective ways to avoid cause of DPC watchdog violation error:-

While, you followed all these steps can solve affecting blue screen error.

  • You have to keep your system windows update.
  • Always drivers should up to date to engage in big trouble.
  • Bear in mind, you should shut down the computer properly after you finished use.
  • Don’t try to force shut down pc.
  • If your system get any of the driver error solve immediately by reinstalling driver software or proper updating.
  • You have to keep the latest version as intel management engine interface up to date.
  • Use disk cleanup and disk defragment regularly for great performance and avoid other issues.
  • Use these drivers or software, which windows version compatible.
  • Don’t upgrade windows while you are utilizing old windows version.
  • Make use of all the guides and hope you enjoy.

Simple Methods To Solve ERR_NAME_RESOLUTION_FAILED Error On Your Browser

In the modern trend, the entire people adopt in the future generation by utilization of advanced technology. Most of the people have been desktop for various purposes to meet all their needs in the effective manner. Initially, the internet plays vital role in all over the worldwide regions. Nowadays without internet there’s nothing to run business or others. Already, many people getting great and pleasurable experience in the use of internet facilities. The main aim of people have been using internet to save their valuable time, effort and money along with do all the tasks without trouble. Mainly, the browser is helpful to connect all sorts of websites like shopping, business, education and some others. Sometimes, the trouble may occur while you access online websites with different problems that easy to fix and some others trouble to fix. Here, you can see ERR_NAME_RESOLUTION_FAILED Error On Your Browser and check out the following methods to fix in the simple and effective without trouble anymore. There are many possibilities to occur problems while you engage in accessing internet websites. Whatever, you are experienced with this problem or not and who are struggling to fix the problem can read everything carefully. Whatever, you are using chrome or firefox the following methods apt to fix the problem.

Solve ERR_NAME_RESOLUTION_FAILED Error On Your Browser

Why ERR_NAME_RESOLUTION_FAILED Error occurs:-

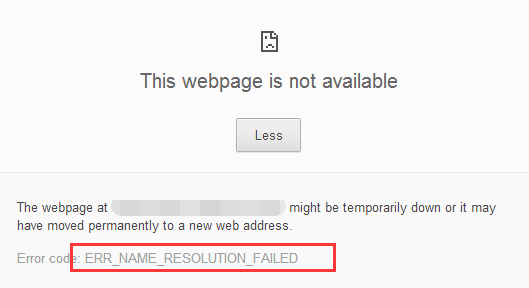
The ERR_NAME_RESOLUTION_FAILED Error involves in firefox, internet explorer or chrome on windows platform IS. This is almost common problem will arise in windows 7 and windows 8 platform, but many of the windows 10 users reporting while they connect internet websites. Mainly we utilize chrome and firefox as default browser because of fast and ease of access. You don’t need to bother about arising issues in your browser and you can easily overcome from stress. The first thing, you have to know how this error occurs in your browser. While any of the website down this error will occurs in your browser. When the damage occurs in IP/TCP protocol settings or other recently installed application may apt for the cause of error. There are two diverse error messages will display, but it have similar solutions. They are act together pointing to a DNS error.

Most of the issues in google chrome occur because of basic things like incorrect setting, cache, or other third party software. While you getting this issue repeatedly when you access internet website just calm down and take a look on the solving guides.

Methods to solve ERR_NAME_RESOLUTION_FAILED Error:-

There’s no single fixing solution for this internet problem, but many of the users solved by the use of following methods. Here, the methods will surely fix the issue ERR_NAME_RESOLUTION_FAILED Error in windows 7, 8 and windows 10 operating system. First, you have to ensure that your internet connection proper because of sometimes connection down due to router failure or ISP maintenance.

  • Method 1 Netsh Winsock reset method to fix issues 137: This is the first method many of the preferred and easy to solve ERR_NAME_RESOLUTION_FAILED Error. The windows socket settings of the TCP/IP protocol will failure and cause some error by any of the third party software installation or some other harmful programs include malware, virus or others. This error will fix easily by use of command in the command prompt.
  • Now, you have to go to windows start option and enter into search option just type run. Or else you can use shortcut as Win + R. The run dialog box will display in the screen.
  • You have to type cmd and press ok.
  • Now, the display open command prompt.
  • The command prompt will display details you just type winsocket reset and click enter button.
  • It takes few more minutes to complete the process.
  • You have to wait until the process complete.
  • It will completely reset your desktop.
  • Once, the process end restart the desktop because of some changes made and update in the system.
  • Now, you can clear the issue and continue browsing with pleasure.

Bear in mind that you should type following commands in the command prompt.

  • ipconfig / release.
  • ipconfig / all.
  • ipconfig / flushdns.
  • Ipconfig / renew.
  • netsh in tip set dns.
  • Netsh winsocket reset.

Method 2 Manual setting for DNS address in the network adapter: here, you can use these simple steps to fix the problem in the effective way.

  • Click windows button or start key.
  • Now, you have to write ‘control panel’ in search bar or you directly select control panel.
  • You have to find out network and sharing center.
  • Now, you have to click ‘change adapter settings’.
  • You can see network table just click twice ‘Internet Protocol Version 4(TCP/IPV4)’.
  • Choose the following DNS server addresses
  • Set preferred DNS server to 8.8.8.8
  • Set alternate DNS server to 8.8.4.4
  • Now, you can open the chrome browser and ensure whether the issue fixed or not by use of this method.

Method 3 Run system file checker: Try this method if you getting ERR_NAME_RESOLUTION_FAILED Error.

  • Click windows option or press start key.
  • Write ‘command’ on windows search bar and you have to right click as ‘command prompt’.
  • Choose ‘run as administrator’.
  • Write sfc/scannow.
  • Click an enter option.

Now, the system file checker will completely scan entire system files as well as fix while any error occurs. If network related data corrupt and they will instantly restored by original system files.

  • Restart DNS client: While DNS client stopped working and the DNS service cache registers computer full name of the computer. If the DNS service completely stopped, the DNS names will potentially continue to resolve, but the DNS name queries results will not cached as well as computer name not register. Whether, the DNS client disabled, any services clearly relate on it and start to fail.
  • Enter into the start menu and press control panel.
  • Now, see view by icons and not as category.
  • Select administrative tools icon.
  • Now, the window will open and click services.
  • See where the DNS client and it says started.
  • Whether the service not started click start option.
  • Ensure, the service right.
  • Restart browser settings: Something has been altered or modified in your chrome browser installing new plugin or other changes in the settings manually. Whatever, the problem that worries you just reset the chrome browser settings by clicking chrome setting, and then advanced settings and press reset browser settings. Now, you clear the problem or you can try other methods to solve instantly.
  • Reconnect router or modem: Mainly, the above mentioned methods surely fix the ERR_NAME_RESOLUTION_FAILED Error nevertheless you can also try this once. Whether any of the above mentioned methods doesn’t work you just troubleshoot as basic step. You have to restart the router or modem. Simply pull the LAN cable and again plug it in the same place. If you are router user, you have to restart router and see whether the issue present or fixed.
  • Disable antivirus: Sometimes the antivirus software may cause this issue. Don’t worry about that you just disable real-time protection in the antivirus. Whatever, you don’t know about the option where it available in the software just right click antivirus icon. You can get menu option and see where the real-time protection turn off it. You can fix the issue by this method also.
  • Uninstall chrome browser: If all these above mentioned methods not properly works just uninstall chrome browser. There are several viruses, which affects chrome browser to create some errors. Open command prompt and type appwiz.cpl. Now, it displays the entire programs that you installed in your system. You have to find out chrome browser and uninstall it. After you successfully uninstall chrome browser again reinstall chrome browser.
  • More tips you can try own: The first thing, you can try website reloading later. Make the google chrome facilitate in the antivirus software or firewall settings. If you utilize any of the proxy server you have to make sure proxy setting proper or not. You can also disable network prediction by simple steps. You have to enter wrench menu as settings and then advanced option and click privacy menu. Now, you just untick as ‘predict network actions to enhance page loading performance’.

There are many errors appearing at diverse places and by various reasons in such criteria. While any of the new errors appear first you have to know reason for the cause of error. In addition, you have to make sure fundamental process right and then you go or try any of the problem solving methods on own. Now, you already read above mentioned methods to solve ERR_NAME_RESOLUTION_FAILED Error and it’s really helpful to solve while you face or others individuals face. Follow the entire simple methods and do carefully whatever you expert in any of the tasks enjoy the pleasure browsing.